Introduction for: Year 1, Lesson 12
Plagues & Passover
The Big Idea (Textual Principle):
At Passover, God saved His people as part of His big plan to send a Savior from Abraham’s family.
Exodus 7-12
Biblical Virtue (Timeless Principle)
It is important to remember what great things God has done.
Memory Verse
When I see the blood, I will pass over you. — Exodus 12:13b
Plagues & Passover
Bible Text: Exodus 7-12
Answer the following questions:
After asking these for yourself, you will be ready to ask these questions of the students after you tell the story.| Question | Answer |
|---|---|
| What did you like in the story? | |
| What did you not like in the story? | |
| What does the story teach you about God? | |
| What does the story teach you about mankind? | |
| What might the Lord be calling you to do after hearing this story? |
Teacher Soft Skills Development
Create 5 Questions and answers to thoughtfully review the text.| Question | Answer | |
|---|---|---|
| Who | ||
| What | ||
| When | ||
| Where | ||
| Why | ||
| How |
Classroom Sequence for Plagues & Passover (Exodus 7-12)
#1 Welcome the Students
AHello students, please sit down and stay quiet for prayer.”
BPray and praise God for a beautiful day, and
ask God to bless the teacher and students.
#2 Rules Review
Use the rules chart to remind everyone to sit, listen, watch, put away their toys/personal items, and have fun.
#3 Music
Sing two or more joyful songs.
#4 Five-Finger Prayer Time
Thumb
Praise God for His
worthy character
Index Finger
Confess sins
Middle Finger
Thank God for
His great care
Ring Finger
Pray for those
who are weak
or in need
Pinky
Pray for my own
needs
#5 Bible Time
Use the rules chart to remind everyone to sit, listen, watch, avoid toys, and have fun.
#6 Story Time
Start by sharing the big idea: “At Passover, God saved His people as part of His big plan to send a Savior from Abraham’s family.”
Engage:
Items to include (don’t explain yet):
- A small bowl or cracker (unleavened bread)
- A red ribbon or string
- A toy bug or animal
- A candle (unlit)
How it works: Take items out one at a time and “What do you think this could be used for?”
Expound: Tell the Story (5-10 minutes)
1. Mention the historical situation.
2. Begin: “This is a true story from God’s
Word.”
3. Tell accurately with gestures/pictures.
(Accurate/Transferable/Contextual/Short)
Explain (Before or after the story – not during):
1. Share insights and biblical principles.
2. Compare with Jesus or NT when appropriate.
3. Identify Christian virtue(s): It is important to remember what great things God has done.
4. Apply an example to real life.
Note: Learning to read the full passage and accurately retell a short version is part of the personal development of the teacher.
#7 Expand
Do 2 or 3 of the following as time permits. The teacher does not have to do everything listed – just choose according to the time permitted.
A. Retell the Story so the students can memorize it.
If possible, tell the story again so the students can memorize it.
B. Craft
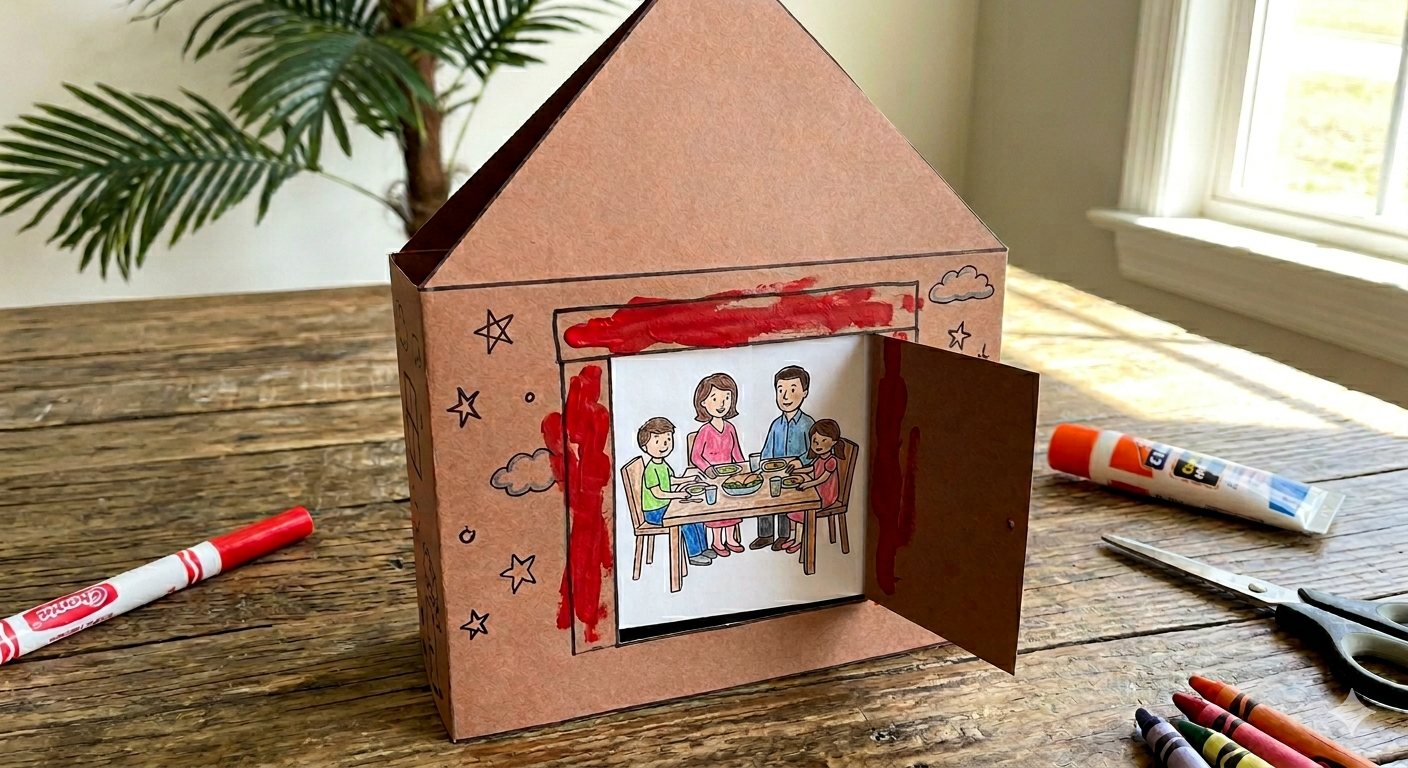
Protected by the Lamb
This craft uses a simple folding technique to create a 3D house effect, emphasizing the blood of the lamb on the doorposts as the sign of God’s protection.
Materials
1 Piece of Cardstock or Construction Paper (Brown or tan works well for the house)
Scraps of White Paper (To draw the family)
Red Marker or Red Paint (To represent the lamb's blood)
Safety Scissors & Glue
Markers or Crayons
10 Simple Steps
- Fold the Paper: Take your large piece of construction paper. Fold it in half like a book. Press the edge down hard so it stays flat.
- Draw the House: Use a pencil to draw a large house on the front cover. Make sure to draw a big, pointed roof at the top.
- Draw the Door: Draw a rectangle shape for a door in the middle of your house.
- Cut the Door: Carefully cut the top and the bottom of the door. Cut the side where the door opens. Important: Do not cut the left side! The door needs to stay attached so it can swing open.
- Paint the Doorframe: Take your red marker or red paint. Draw a thick, bright red line across the top of the door and down both sides.
- Draw the Family: Take your small piece of white paper. Draw a simple picture of a family sitting together and eating a meal.
- Color the Picture: Use your crayons to color the family and their food. Make it look happy and bright.
- Glue the Picture: Open your folded construction paper. Rub glue on the back of your family picture. Stick it to the inside of the card, right behind the door.
- Test the Door: Close the front of the house. Open the door to make sure you can see the whole family sitting safely inside.
- Write the Verse: On the roof or the back of the house, write this: Exodus 12:13
How to Use It In The Lesson
Interactive Storytelling: Have the children practice opening and closing the door. Explain that the red mark on the outside was a sign of faith that kept the family inside safe
Discussion: Talk about how the Israelites had to trust God’s instructions exactly. This craft serves as a physical reminder that we can trust God to protect us
Home Use: Encourage them to take their houses home to show their parents, using the moving door to retell the story of the very first Passover
C. Total Physical Response
Teacher reminder: “We move our hands together, slowly, and at the same time, like one group.”
Hand‑Shape Poem with Actions (Synchronized)
| Poem Line (Say Together Slowly) | Everyone’s Hand Movements (In Sync) | Meaning |
|---|---|---|
| God gave warning, strong and clear. | Point forward → Make a fist → Open hands | Power is shown |
| His power spread both far and near. | Wiggle fingers downward → Move hands across body → Hold open | Power fills the land |
| Pharaoh said, “No, not today.” | Cross arms → Shake head slowly → Hold | Refusal |
| God showed power anyway. | Lift both hands up → Slowly open → Lower | Power continues |
| God kept His people safe inside. | Make a roof shape over head → Hold | Protection |
| The firstborn were passed over, kept safe. | One hand passes over the other → Stop | Lives protected |
| God set them free — His people go! | Hands open forward → Relax at sides | Rescue |
How to Use This TPR
- Round 1: Teacher says poem lines and models actions
- Round 2: Children say poem together with actions
- Round 3: Silent mime — hands only, fully synchronized
Encourage:
- same pace
- same size movements
- stopping and holding together
Optional Closing Line (With One Motion)
Children place a hand on their heart and say together:
“God is powerful. God protects His people.”
